Showing posts with label Photoshop CS6. Show all posts

Friday, 30 November 2012

Tutorial : Create a picture from text (colored)

Here is a small addition to this tutorial, which showed you how to transform a regular picture into a picture that is created only from text in black & white. In the following HowTo I am going to be showing you how to achieve the same effect while keeping the colors of the original picture. The reason I am separating this, is because it uses a quite different technique.


Here are two different examples :


Okay let's get started !

Difficulty : Very Easy


1.) Open a picture that you want to transform 

Monday, 19 November 2012

Tutorial : Create a picture from text (Black & White)

In this tutorial I'm gonna be showing you how to transform a simple portrait or an image of your choice into a  picture that looks like its made only from text.


Here are two examples : 


The effect is pretty simple to create and looks kinda cool , so let's get started :

1.)  Open up a picture in Photoshop and create a new layer (CTRL+SHIFT+N)

2.) Fill that new layer black with the Fill Tool (G) 

Sunday, 11 November 2012

Tutorial : Advanced face swap ( Auto-blend )

Okay, so finally here it is : a short addition to the first face swapping tutorial which did not cover what to do if the people's skin color differs. I will be using the following pictures as an example :


We wanna go ahead and put Samuel L. Jackson's face onto Chris Browns head. As you can see the skin tone and the lighting are different. At this point I want to state that there are various ways to accomplish this in Photoshop and I will be showing one way to do it using the Auto-Blend function of Adobe Photoshop.  

Tuesday, 6 November 2012

New Blog banner : Futuristic, Grungy Metal Text Effect

Hey there,
as I have recently updated the blogs layout a bit, I also created a brand new banner with this awesome looking Futuristic Mental Text effect. Well, because I have posted so many text effect tutorials lately and it starts to get kind of boring I will just link you to the two tutorials that helped me create this thing.


Here is the original text-tutorial by Dylan Roberson from tutplus.com : [ Click ]

In case you are interested in a video tutorial, here's the video that led me to the original written one.

Thursday, 1 November 2012

Tutorial : Glass Font #2

Alright here is another way to get a  nice glass font in Photoshop. Well actually it's the same procedure but with different settings on the layer style.

This is what we will be looking at : 

Okay lets get started.

1.) Open a nice Background of your choice and create a new Text Layer using the Text Tool (T)
For this tutorial I use Font-Size 500px and the font called "Franklin Gothic Heavy"
Note : If you use a smaller font-size, you will have to adjust the layer style settings that I show later 

2.) When you got your text add a layer style by clicking the button shown below and select "Blending Options..." from the drop-down menu.


3.) Okay, we will need the following effects : Bevel & Emboss, Stroke, Inner Glow and Outer Glow

Monday, 15 October 2012

Tutorial : How to create a Favicon in Photoshop

This is a little HowTo on how to pimp your own website a little bit by creating your own Favicon.
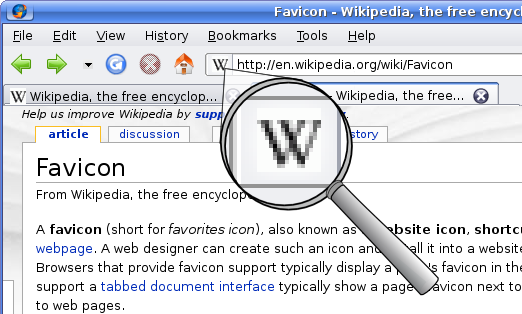
You may wonder what a Favicon is. The name itself stands for "Favorite Icon" and when you open a webpage in your browser the Favicon can be found here :

Image source : Wikipedia.org
Usually you will have a boring white page in that position instead of a custom icon. In order to change that we have to create one using Adobe Photoshop.

  • We need to download a plug-in for Photoshop called ICO Format in order to be able to save .ico files. The download for the plugin can be found at http://www.telegraphics.com.au/sw/. There might be other plugins but for this tutorial i recommend using this one. 
  • You will find a Readme.html along with the downloaded plugin but here is a short version of how to install it : 
    • Go to C:\Program Files\Adobe\Adobe Photoshop\Plug-ins\
    • Create a new folder called 'File Formats' if there's none yet
    • Put the downloaded "ICOFormat.8bi" into the File Formats folder and start up Photoshop
  • After that's done create a new picture in Photoshop with the dimensions 64x64 pixels.
  • Now you are free to draw or design whatever you like

  • When you're done hit File > Save As and select "Save as : Icon ( Windows ICON)(*.ico)"


Aaaand you are finished ! 

At this point I'd like to tell you how to set your favicon up but it depends on what webhost you are on. For Google Blogger you can directly upload a file and for all the others :
Upload the .ico to the root directory of your webspace and then insert the following line into the <head> section of all of your webpages : 

<link href="/favicon.ico" rel="SHORTCUT ICON"></link> 

Thursday, 11 October 2012

Tutorial : Nice Gold Text Effect

Hey, finally back with another post !
I figured I would show how to create a nice Gold Text effect.

This is what you will be able to accomplish after this tutorial :

For example a nice wallpaper with your name on it

Difficulty : Easy (but needs a little time investment)


Thursday, 4 October 2012

Tutorial : Black and White in Photoshop

This time I'm going to post a pretty easy one.
It's how to do Black/White Pictures in Photoshop. A friend recently requested me to edit a picture for him (TalesFromBombay). The task was, to isolate a certain part in the picture and let it be in color while the rest of the picture should be black and white. This effect is pretty useful to make certain things stand out (e.g. a single person standing in a crowded place)


With that being said, let's begin  :

Difficulty : Easy


Tuesday, 2 October 2012

Tutorial : How to face swap in Photoshop

Here is the tutorial as promised :-)
Let's quit the unnecessary talking and get started :

For this tutorial we will be using the following picture :

(We want to copy the right face on the left girl)