Friday 21 December 2012

Color Black and White pictures (alternative method)


Here is part two with another way on how to color your black and white portraits. It won't be a long post as the method is very simple and straight forward. The coloring can be achieved within seconds and the effect does what its supposed to.

Nothing much left to say, so let's get started

This is the portrait that I am going to use as an example in this tutorial :


1.) Open the picture in Photoshop

2.) Duplicate the background layer and leave the background locked as a backup copy. 


Saturday 15 December 2012

Color Black&White Pictures ( Curves Adjustment Layer )


In this tutorial I'm gonna be covering one method on how to color black and white pictures.
As always, thanks to the huge diversity that Photoshop offers there are multiple ways on how to achieve the coloring. I will only cover one of them right here. A different way can be found here : coming soon


The basic idea that comes with every BW-picture that you want to colorize is that you create a selection of an object or a certain part of the picture and then you do the magic on the 

Let's get started :

1.) Open a Black and White picture of your choice in Photoshop.

I'm gonna be using the following picture as an example


2.) For better color results with this method I recommend you to change the image color mode to CMYK Color by navigating to „Image > Mode > CMYK Color


3.) Now there are several ways to create a selection in Photoshop. For this method I prefere going with the Quick Selection Tool (W). 

Tip : When you use the Quick Selection Tool you can hold the ALT-Key while clicking to exclude certain parts from your selection without having to create a new selection all over.

Wednesday 5 December 2012

Create your own Wallpaper #3 : Pokemon !

So I've stumbled upon a very cool and original Pokemon wallpaper and I was wondering if I could recreate a very similar one with one or more pokemon of my choice.


This is what the original wallpaper looks like :


And then I found a very similar one , probably created by someone else :


The reason why I wanted to show this 2nd example is, because it lacks some little tweaks in my opinion and in the following tutorial I can teach you how you can achieve the best result possible !


Let's get started :


1.) Create a document in Photoshop with the dimensions of your desktop resolution. For me I am going with an image size of 1920x1080.


Friday 30 November 2012

Tutorial : Create a picture from text (colored)

Here is a small addition to this tutorial, which showed you how to transform a regular picture into a picture that is created only from text in black & white. In the following HowTo I am going to be showing you how to achieve the same effect while keeping the colors of the original picture. The reason I am separating this, is because it uses a quite different technique.


Here are two different examples :


Okay let's get started !

Difficulty : Very Easy


1.) Open a picture that you want to transform 

Monday 19 November 2012

Tutorial : Create a picture from text (Black & White)

In this tutorial I'm gonna be showing you how to transform a simple portrait or an image of your choice into a  picture that looks like its made only from text.


Here are two examples : 


The effect is pretty simple to create and looks kinda cool , so let's get started :

1.)  Open up a picture in Photoshop and create a new layer (CTRL+SHIFT+N)

2.) Fill that new layer black with the Fill Tool (G) 

Sunday 11 November 2012

Tutorial : Advanced face swap ( Auto-blend )

Okay, so finally here it is : a short addition to the first face swapping tutorial which did not cover what to do if the people's skin color differs. I will be using the following pictures as an example :


We wanna go ahead and put Samuel L. Jackson's face onto Chris Browns head. As you can see the skin tone and the lighting are different. At this point I want to state that there are various ways to accomplish this in Photoshop and I will be showing one way to do it using the Auto-Blend function of Adobe Photoshop.  

Tuesday 6 November 2012

New Blog banner : Futuristic, Grungy Metal Text Effect

Hey there,
as I have recently updated the blogs layout a bit, I also created a brand new banner with this awesome looking Futuristic Mental Text effect. Well, because I have posted so many text effect tutorials lately and it starts to get kind of boring I will just link you to the two tutorials that helped me create this thing.


Here is the original text-tutorial by Dylan Roberson from tutplus.com : [ Click ]

In case you are interested in a video tutorial, here's the video that led me to the original written one.

Sunday 4 November 2012

Create your own Wallpaper #2 : Glowing Lines

Second tutorial in an hopefully never-ending series.
This time I'm gonna be showing you how to create a wallpaper with a nice looking Glow-Lines effect and this is what you could achieve after following this tutorial : 

______________________________________________________________________


______________________________________________________________________

I'm going to show you how to create the simple but nice looking effect yourself and if you experiment with some settings you might get a really cool result. Soooo let's get started ! 

Thursday 1 November 2012

Tutorial : Glass Font #2

Alright here is another way to get a  nice glass font in Photoshop. Well actually it's the same procedure but with different settings on the layer style.

This is what we will be looking at : 

Okay lets get started.

1.) Open a nice Background of your choice and create a new Text Layer using the Text Tool (T)
For this tutorial I use Font-Size 500px and the font called "Franklin Gothic Heavy"
Note : If you use a smaller font-size, you will have to adjust the layer style settings that I show later 

2.) When you got your text add a layer style by clicking the button shown below and select "Blending Options..." from the drop-down menu.


3.) Okay, we will need the following effects : Bevel & Emboss, Stroke, Inner Glow and Outer Glow

Saturday 27 October 2012

Create your own Wallpaper #1 : Rainbow

There are so many ways on creating nice HD wallpapers yourself in Photoshop, so I figured I would post a tutorial series on it. Today starting with a rainbow/spectrum wallpaper. I've seen alot of abstract wallpapers that look like this but here's how you create one yourself that is fully customizable to your own tastes.

So this is what a result could look like after following this tutorial :


  • First step as always create a new File in Photoshop with the resolution of your current screen resolution ( mine's 1920x1080 px )
  • Unlock your Background layer by double clicking on it 
  • Select the Gradient Tool (Hotkey : G) and create a black and white gradient form the bottom to the top. To do so click somewhere on the bottom of the image, hold shift and drag up until the upper edge of your background. 
  • You should be looking at something like this  : 


  • Next go to Filter > Distort > Wave
  • In the upcoming window change the number of generators to 10 and the Type to "Square" and press OK.


Result so far : 

Friday 26 October 2012

Tutorial : Glass Font #1

It's been a while since the last post but here is another tutorial.
As you might be able to guess from the title it is going to be about another text effect.

Before we start I'd like to show you how the result would look like :


I won't be going too much into detail as the steps are very similar to the ones in the Gold Text tutorial. 

  • Open up Photoshop and open a wallpaper that you like or one that you think would match with the glass text. If there is none, create a new image (File -> New...) and fill the background with a color of your choice using the Paint Bucket Tool ( Hotkey : G )
  • Once that's done, select the TextType Tool (T) and write a word with a big (200-300px) font (font-color : white). In this tutorial I'm gonna be using the font called "Franklin Gothic ITC Heavy"
  • Then we need to add a layer style by clicking the following button while having the text layer selected

  • From the drop-down choose "Blending Options..."
  • The next window should seem familiar if you have followed the gold text tutorial.
  • We need to add the following Styles : Bevel & Emboss, Stroke, Inner Shadow, Inner Glow, Satin, Drop Shadow
  • For keeping it short and easy i will be posting my settings that have worked out pretty well and that were used to get the result above. As always you can try and experiment with the settings to get something new. 

Monday 15 October 2012

Tutorial : How to create a Favicon in Photoshop

This is a little HowTo on how to pimp your own website a little bit by creating your own Favicon.
You may wonder what a Favicon is. The name itself stands for "Favorite Icon" and when you open a webpage in your browser the Favicon can be found here :

Image source : Wikipedia.org
Usually you will have a boring white page in that position instead of a custom icon. In order to change that we have to create one using Adobe Photoshop.

  • We need to download a plug-in for Photoshop called ICO Format in order to be able to save .ico files. The download for the plugin can be found at http://www.telegraphics.com.au/sw/. There might be other plugins but for this tutorial i recommend using this one. 
  • You will find a Readme.html along with the downloaded plugin but here is a short version of how to install it : 
    • Go to C:\Program Files\Adobe\Adobe Photoshop\Plug-ins\
    • Create a new folder called 'File Formats' if there's none yet
    • Put the downloaded "ICOFormat.8bi" into the File Formats folder and start up Photoshop
  • After that's done create a new picture in Photoshop with the dimensions 64x64 pixels.
  • Now you are free to draw or design whatever you like

  • When you're done hit File > Save As and select "Save as : Icon ( Windows ICON)(*.ico)"


Aaaand you are finished ! 

At this point I'd like to tell you how to set your favicon up but it depends on what webhost you are on. For Google Blogger you can directly upload a file and for all the others :
Upload the .ico to the root directory of your webspace and then insert the following line into the <head> section of all of your webpages : 

<link href="/favicon.ico" rel="SHORTCUT ICON"></link> 

Thursday 11 October 2012

Tutorial : Nice Gold Text Effect

Hey, finally back with another post !
I figured I would show how to create a nice Gold Text effect.

This is what you will be able to accomplish after this tutorial :

For example a nice wallpaper with your name on it

Difficulty : Easy (but needs a little time investment)


Thursday 4 October 2012

Tutorial : Black and White in Photoshop

This time I'm going to post a pretty easy one.
It's how to do Black/White Pictures in Photoshop. A friend recently requested me to edit a picture for him (TalesFromBombay). The task was, to isolate a certain part in the picture and let it be in color while the rest of the picture should be black and white. This effect is pretty useful to make certain things stand out (e.g. a single person standing in a crowded place)


With that being said, let's begin  :

Difficulty : Easy


Tuesday 2 October 2012

Tutorial : How to face swap in Photoshop

Here is the tutorial as promised :-)
Let's quit the unnecessary talking and get started :

For this tutorial we will be using the following picture :

(We want to copy the right face on the left girl)


Hilarious : Face Swapping / Facebombing


Ohh yeah... Again and again I find it very amusing when I find a similar picture on the internet.
For those who may not know yet : The procedure that happened in this picture, is also known as Faceswapping or Facebombing. You simply switch the face of one or more individuals with one that looks really funny (e.g. if someone's grimacing) and the best part of it is, that all of this can be easily achieved by using modern picture editing software like Adobe Photoshop.


Sunday 30 September 2012

"Art is dead"

"You can't earn money with arts. Who would buy that?"
"You will end up homeless and unemployed"

These were the words of a friend of mine when we were chatting about random stuff and somehow got to the topic arts. I must say that I find these quotes pretty narrow-minded and can only assume that he was referring to the traditional art as in "creating a tableau and selling it to a museum". If so I don't want to fully agree on it but I'm sure that you will have a hard time to to make it big with something like that as a young artist.

But that's not the point right now. This conversation showed me how some people are still believing in the old fashioned picutre of an artist. In which they are supposed to wear a beret, live in a mess and draw oil paintings every day. I know better than that. Time and modern technology helped to bring a big change to the art sector. For example, let's mention an artist job that my buddy might be interested in and which could show him how awesome and up-to-date art can be. I am talking about a 2D production artist that works for a video game company for example.
His task is it to create and draw characters, the setup of certain scenarios (in terms of lighting, mood etc.) and so on. By that he builds the foundation for what we can see in the video game itself later.

Image credit to Empire Building Network

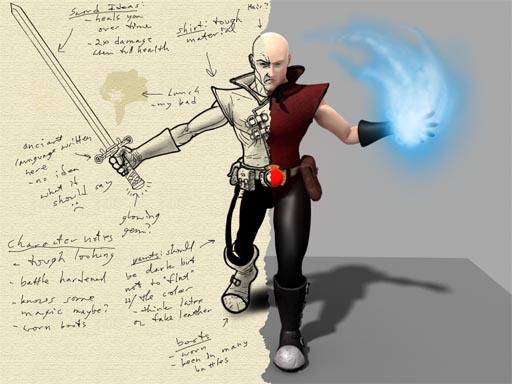
Take this picture for example. On the left you can see the sketch that an artist has created. With tons of little notes and explanations. And on the right you can see the finished 3D modelled character which will appear  in the game like that.
With that said, we just let another awesome job unmentioned. Namely the 3D-artist. The sculptor of today. The sculptor that does not use marble to create his masterpieces but virtual polygons. With the use of complex modelling programs he is able to transform a harmless little 2D sketch into a movable character in-game.


So much for art is dead ! I could go on listing many more unnoticed activities and jobs that have very well something to do with arts and which are extremely profitable.


The beginning of a harmless little Blog

Sooo... First post ever on my own blog !


My motivation for this ? I've always liked the idea of an open journal but never felt like creating one myself. I didn't know what to write about and nor did I know how all of this really worked.

...Until a good friend of mine told me something about him blogging and how easy and great it was.
After his report I suddenly felt the urge to create a blog myself and create a nice little place on the web
where I can be myself and write about whatever I want. Of course its not going to be random trash talk.

I will try to follow a certain pattern/topic but I can't tell by now. I think that most likely it will be about arts in general whether it'll be a small (photoshop) tutorial, an artwork of mine or to share my opinion on a certain topic. (Yeah I guess that's pretty much what blogs are ment for !:))

As someone who likes to take things as they come I can't tell form now how this whole thing will develop.
I just like the idea of a blog as sort of an open diary on which you can look back and remember the one or other. It also might help to get connected to some like-minded people ! Who knows !

I think this is it for now. Not much more to say !
Maybe one day I can come back to look at this post and remember how a great thing started :-)